|
|||||||
| Home | Forum | Online Store | Information | LJ Webcam | Gallery | Register | FAQ | Community | Calendar | Today's Posts | Search |
 |
|
|
Thread Tools | Display Modes |
 04-27-2013, 06:48 PM
|
#381 | |
|
Member
Join Date: Apr 2013
Posts: 42
|
Quote:
|
|

|

|
|
04-27-2013, 09:52 PM
|
#382 | |
|
Senior Member

Join Date: Mar 2010
Location: San Diego
Posts: 2,385
|
Quote:
__________________
No better time than being on the water, God Bless, JimmyZ 
|
|
|
|
|
|
04-28-2013, 10:13 AM
|
#383 | |
|
Member
Join Date: Apr 2013
Posts: 42
|
Quote:
|
|
|
|
|
|
05-03-2013, 09:08 PM
|
#384 |
|
Member
Join Date: Feb 2013
Location: Ventura
Posts: 76
|
Used to store the kayak on the harbor freight stand but always found the kayak tipping to one side and it was rather difficult to load it on there. Found a free used memory foam mattress on craigslist. Cut it lengthwise down the middle and it works great. Cradles the kayak awesome with no hard spots.
|
|
|
|
|
07-15-2013, 02:13 PM
|
#385 |
|
Emperor

Join Date: May 2009
Location: Buena Park
Posts: 3,649
|
PA Rescue Ladder
Came across this idea from another dude on the hobie forum. Looked like a great way for re-entering your PA. All it is is rope attached to some kind of pipe, then that's attached to the back handle of the PA.
I tested this on Saturday and it worked great! Climbing on the PA from the rear seems to be the easiest way to get back on...at least for me it is. Is the ladder necessary to get back on...no...but it sure makes it a hell of a lot easier. I would imagine with waders full of water...anyway to make it easier could be a life saver. In order for this to work, after you fall in the water...you have to swim over to the rear handle, give a sharp tug to the ladder, it will release from the bungee. You let the ladder hang down in the water, then you grab the PA back handle with both hands pull down and lift yourself up. As you are holding yourself up put one foot then the other on the ladder, lean forward, and your body weight should shift forward, and your back on. Then at that point you just climb back to the front seating position. Stowed Position  Deployed Position 
__________________
There's nothing colder than yesterday's hotdog. |
|
|
|
|
07-15-2013, 10:20 PM
|
#386 | |
|
Senior Member
Join Date: Mar 2010
Location: San Diego
Posts: 2,385
|
Quote:
__________________
No better time than being on the water, God Bless, JimmyZ
|
|
|
|
|
|
07-15-2013, 11:05 PM
|
#387 |
|
Senior Member

Join Date: Apr 2013
Location: Oceanside
Posts: 1,470
|
Made myself a fish beating stick. Ive been wanting one one for a while and after a few beers me and a buddy built this with left over stuff found around the house/ garage.
__________________

|
|
|
|
|
07-16-2013, 05:58 AM
|
#388 | |
|
Senior Member

Join Date: Mar 2011
Location: Santa Ana/Westminster
Posts: 1,258
|
Quote:
__________________
Kevin Yellow PA12 |
|
|
|
|
|
07-17-2013, 06:03 PM
|
#389 |
|
Senior Member
Join Date: Aug 2012
Posts: 109
|
be careful with the PVC. That looks like a health size and I have never hit anything with PVC that large. I have hit things with smaller (1 inch diameter) PVC and the issue is it shatters. Post up how it works after you beat down a fish or two.
|
|
|
|
|
07-18-2013, 08:14 AM
|
#390 | |
|
Team Keine Zugehörigkeit

Join Date: Nov 2010
Location: Way out there
Posts: 2,854
|
Quote:

__________________
 Não alimente os trolls------------Don't feed the trolls---------------インタネット荒らしを無視しろ 
|
|
|
|
|
|
07-19-2013, 03:24 PM
|
#391 |
|
Senior Member
Join Date: Apr 2013
Location: Oceanside
Posts: 1,470
|
It works great its filled with sand. I tested it out hitting alot of stuff, took a couple mackerel out in the driveway and beat em into mush and the side of my kayak is alot more forgiving than concrete.
__________________
|
|
|
|
|
07-22-2013, 09:11 AM
|
#392 |
|
Guest
Posts: n/a
|
Doing a slow and steady restoration on an ole 78' Bronco. It's going to be my beach runner/kayak hauler. I'm tired of my Jeep smelling like fish and salt everytime I come home from fishing.
The bed was just a smidge too short to have a good stable platform for the PA, and I really don't like the idea of a bed extender that has to come on and off. I don't have enough room for the stuff I already own. So I whipped this bad boy up. Made from 1inch square stock. I couldn't find a foam pad long enough so I took a pool noodle and wrapped it in some nice abrasion resistance fabric I found at Joannes. The bar cost about $24 to make and the pad was $8. For $32 and some of my time, I'm pretty happy with the results. 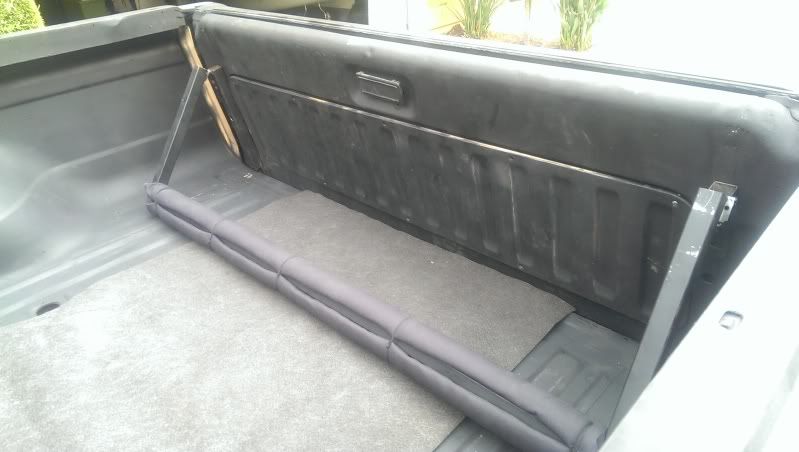 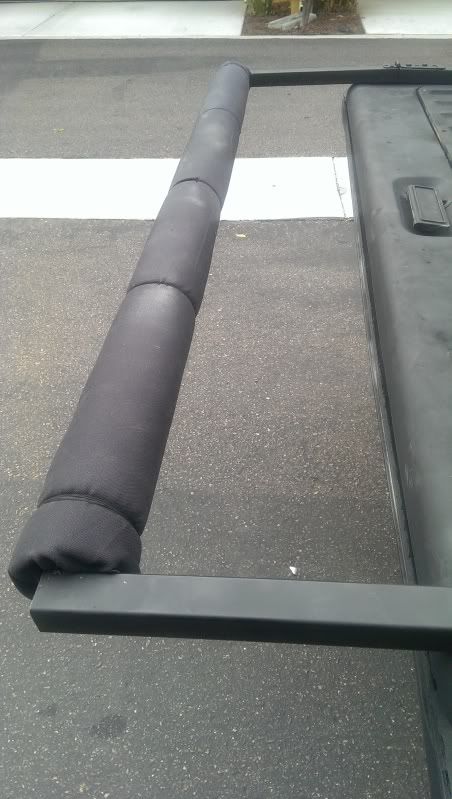 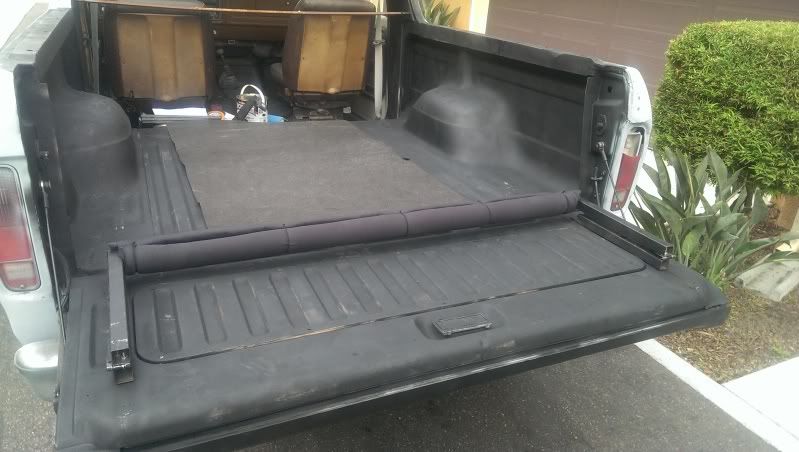 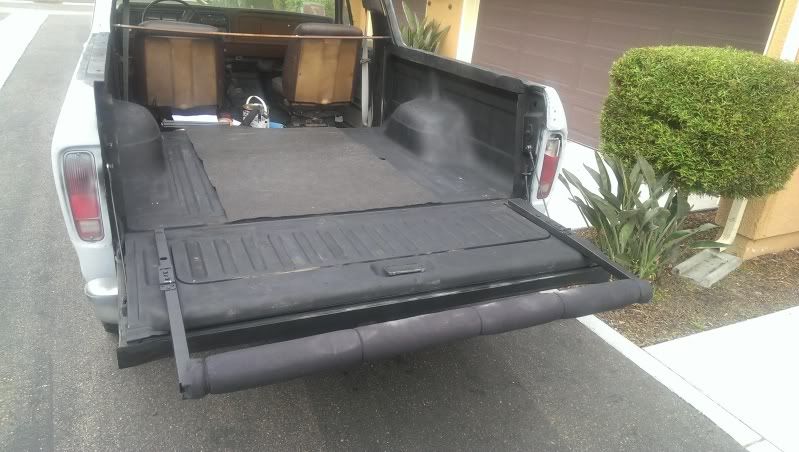 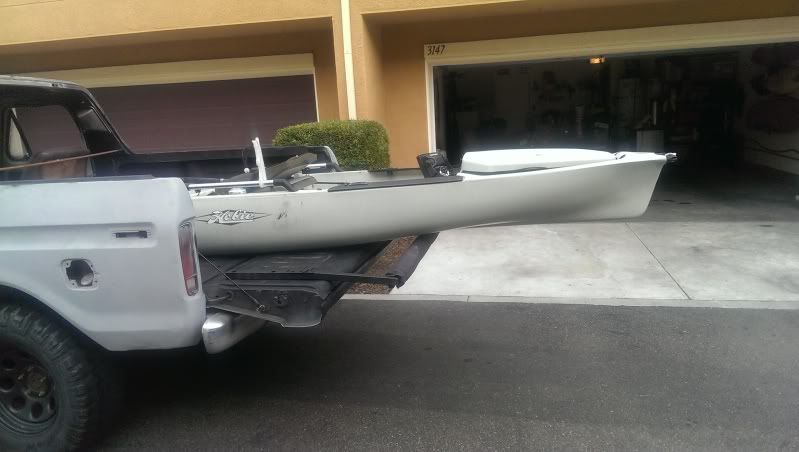
|
|
|
|
07-22-2013, 10:37 AM
|
#393 |
|
Baitless on Baja

Join Date: May 2013
Location: Vista California, Gonzaga, San Quintin, Asuncion, Mag Bay
Posts: 4,250
|
That is a nice simple solution for an extender.
__________________
http://www.mako-ville.com Home 760-630-4470 Cell 760-520-2514 YES YOU CAN |
|
|
|
|
07-26-2013, 01:07 PM
|
#394 |
|
Senior Member

Join Date: Jul 2012
Location: Oceanside, CA
Posts: 419
|
Found these videos on building a kayak cart.
http://palmettokayakfishing.blogspot...art-build.html http://palmettokayakfishing.blogspot...ayak-cart.html
__________________
   
|
|
|
|
|
07-26-2013, 02:01 PM
|
#395 | |
|
Senior Member

Join Date: Feb 2013
Location: Seal Beach, CA
Posts: 428
|
Quote:
Just wondering how long your kayak is? It looks like a PA, but not sure if it's the 12 or the 14? I have an Oasis tandem, which is 14.5ft. Does the front of your kayak rest IN BETWEEN your seats? I guess I'm just wondering how much length of kayak is inside and resting on the truck bed+liftgate+extender, and how much is hanging off the back. Thanks.. 
|
|
|
|
|
|
07-26-2013, 05:01 PM
|
#396 |
|
Made in U.S.A.

Join Date: Oct 2012
Location: Dana Point
Posts: 1,625
|
Don't take this wrong because I think that's a good idea, but from the pictures it looks like a weak design with those hinges. Plus is that short of an extension even worth it? I think maybe a bigger tube on the tailgate with an extension tube that slips inside the bigger one would be clean and strong.
__________________
Hobie PA 14 ¸.·´¯`·.´¯`·.¸¸.·´¯`·.¸><(((º> Jackson Kraken ¸.·´¯`·.¸.·´¯`·.´¯`·.¸¸.·´¯`·.¸><(((º> Malibu X-Factor ¸.·´¯`·.´¯`·.¸¸.·´¯`·.¸><(((º> Malibu Stealth-12 ¸.·´¯`·.´¯`·.¸¸.·´¯`·.¸><(((º> Its not a spelling B its a fishing B ~yakjoe
|
|
|
|
|
07-26-2013, 08:08 PM
|
#397 |
|
Senior Member
Join Date: Feb 2013
Location: Seal Beach, CA
Posts: 428
|
I think it's probably good. I agree, that a tube sliding within a larger tube would be much stronger and eliminate the hinge. But, I think the way it is the kayak center-of-gravity (COG) is well in front of that hinge. I think this rear extender is not supporting much weight, and just mainly for balance and some more spreading or distribution of the weight. I like that it folds out of the way. Also, I could see it possible to add a short bar on each arm to span across the hinge to lock it in and further reinforce this weak point.
|
|
|
|
|
07-27-2013, 08:09 AM
|
#398 |
|
Guest
Posts: n/a
|
I popped the original pin out of the hinges and replaced them with high grade stainless steel bolts. The hinge holds my weight at 220lb. Also, that little bit of an extension really was all I needed. It also gave me an additional place to strap the kayak down. I strap it like I would to any other roof rack. I'm an engineer. I though of everthing
 The sliding tube was my first thought, but coating it to prevent rust was an issue, since the paint of the smaller tube would continue to scrape off |
|
|
|
07-27-2013, 11:21 AM
|
#399 | |
|
Team Keine Zugehörigkeit
Join Date: Nov 2010
Location: Way out there
Posts: 2,854
|
Quote:

__________________
Não alimente os trolls------------Don't feed the trolls---------------インタネット荒らしを無視しろ
|
|
|
|
|
|
07-29-2013, 08:19 PM
|
#400 |
|
Senior Member
Join Date: Mar 2010
Location: San Diego
Posts: 2,385
|
Another DIY Kayak Cart?
__________________
No better time than being on the water, God Bless, JimmyZ
|
|
|
|
|
| Tags |
| kayak fishing inovations, kayak rigging ideas |
|
|


 Linear Mode

