|
|||||||
| Home | Forum | Online Store | Information | LJ Webcam | Gallery | Register | FAQ | Community | Calendar | Today's Posts | Search |
 |
|
|
Thread Tools | Display Modes |
 06-29-2008, 02:54 PM
|
#1 |
|
Senior Member

Join Date: Mar 2005
Posts: 446
|
Malibu X-13 Options
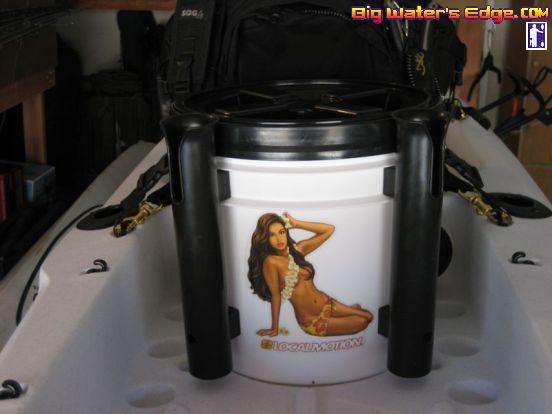 Before anyone gets their panties in a bunch, "YES" I am sponsored by MK and have been for a number of years. I'm going to start this thread now and continue to add as I configure my new X-13 with different rigging options. I've done several already, but I'm just going to add one or two at a time and whenever I feel like typing a post. My goal for this yak was to outfit the yak with all my needs, however maintain the use of the front hatch for its original intent. Andy "Iceman" already demonstrated that the hatch could effectively be removed if need be and so I didn't need to reinforce that or prove that it could be done, master has already done that  . Feel free to add to the post if you have something unique that you have done to your X-13. When a new model comes out it's always nice to see what others have done and maybe it will work for you also. . Feel free to add to the post if you have something unique that you have done to your X-13. When a new model comes out it's always nice to see what others have done and maybe it will work for you also. I've continued my preference for a "white" yak and hope the sharks think it's the belly of a GWSlol and because it looks cool. After a white pro2 tandem, a white pro eXplorer, and two white eXtremes...I thereby knighted it Nemo V  . .My first addition was a new NemoTank. I really like the 'kayatank' and the use of a thru-hull pump for what it was intended for and wanted to install one for this yak but I just couldn't give up my front center hatch, I pack to much food and crap to give that up. I liked my current tank that has been bullet proof for a few years but wanted to get away from having to prime, and I definitely didn't want to go back to dragging a bilge pump through the water. After much thought a light bulb switched on and told me to go back to the basics. So like almost every fishing boat out there I decided to use a thru-hull pump to go through the hull and out to an external bait tank. I made a very little change to Nemotank III for the input fittings and kept everything else the same. I ended up with a clean, simple, and effective design. This concept will probably work on a variety of kayaks with little modifications. It runs off a 6V 7Amp battery. I present to you NemoTank IV. (Don't mind the circular hatch, that's something else  ) )
|

|

|
|
06-29-2008, 03:06 PM
|
#2 |
|
Senior Member

Join Date: Mar 2005
Posts: 719
|
Greg;
nice looking rig. My panties stopped bunching when I switch to the thong type. Trying to get a good pic of them now, but I can't seem to get a good angle.  I miss my thru-hull pump and plan going back to it on my trident. Even with the external deck it's really nice not dragging the pump around. My old cabo had a thru hull and an external tank. |
|
|
|
|
06-29-2008, 03:24 PM
|
#3 |
|
Senior Member

Join Date: Mar 2005
Location: South of La Jolla...
Posts: 1,193
|
SICK set up, Grego. Love my white X. Anymore pictures?
__________________
Hmmmm..... |
|
|
|
|
06-29-2008, 04:54 PM
|
#4 |
|
Senior Member

Join Date: Mar 2005
Location: ...waaaay out there
Posts: 794
|
I like the way you plumbed your tank, Grego. If I get the X-13, I think I'll do the same.
__________________
|
|
|
|
|
06-29-2008, 08:46 PM
|
#5 |
|
Junior
Join Date: Jun 2008
Posts: 13
|
More! More! The pics are great, do you have any of the bottom side of the hull? What is the extra circular thing for? Any overall pics of the boat?
I shuld be taking delivery of mine tomorrow with the x-wing and rudder package. I will be posting up some of my mods as well. |
|
|
|
|
06-29-2008, 09:46 PM
|
#6 |
|
Senior Member

Join Date: Sep 2005
Posts: 1,922
|
Thats pretty cool Grego,
Very clean install. Is that a 3 gallon bucket? |
|
|
|
|
06-30-2008, 06:36 AM
|
#7 | |
|
Administrator

Join Date: Mar 2005
Location: 1-2 miles off the point
Posts: 6,948
|
Very cool Grego, since talking to ya I have been thinking that I have to do the same. Through hull and 3.5 tank is perfect for the X 13.
Quote:
__________________
 
|
|
|
|
|
|
06-30-2008, 07:05 AM
|
#8 | |
|
Senior Member
Join Date: Mar 2005
Posts: 446
|
Quote:
 Art, that's HOT!! Art, that's HOT!!Yes, 3.5 has been my preference....lower center of gravity, bait last as long as a 5 and just looks way cooler. I'll try and get some more pics. Andy, the XM Radio didn't work out exactly right. The dang mold of the seat makes it difficult. It's still doable but I turned it into something else and am waiting for option B to arrive. My next option I'll show my front hatch seal modification, it really turned out and works well. |
|
|
|
|
|
06-30-2008, 07:20 AM
|
#9 |
|
BANNED

Join Date: Mar 2005
Location: W of 5
Posts: 1,265
|
Option "B":

|
|
|
|
|
06-30-2008, 08:09 PM
|
#10 |
|
Senior Member
Join Date: Mar 2005
Posts: 446
|
Here's some requested photos for the "looky loos"...nothing exciting
The pump intake...just a lot of 3M goop and a mesh netting to keep debris out. Battery Box that I just slide forward/back (glued some foam underneath to give it traction). And the body shot...that STS seat is the most comfortable I've sat on but pricey to buy. I have a really bad lower back and need all the cushion I can get, can't skimp out there no matter the price. Thanks to hook1 for hook'n me up with that  . Humminbird 563c w/internal gps, decided to upgrade but don't ask me about "reviews" cuz I only used it twice for an hour and the first time I had a bad ducer install lol . Humminbird 563c w/internal gps, decided to upgrade but don't ask me about "reviews" cuz I only used it twice for an hour and the first time I had a bad ducer install lol
|
|
|
|
|
06-30-2008, 08:32 PM
|
#11 |
|
Senior Member
Join Date: Mar 2005
Posts: 446
|
Ok here's an option for the front hatch. First I hated that top clip, didn't look clean so I removed it and welded plastic into the holes. Instead I have a 'dummy' cord attached to the inside lip of the cover and secured to the yak. The function of that clip was so you don't lose the hatch on the water.
Second, I added this rubber marine seal stuff from home depot. It comes stuck together but easily splices into a single strip. Sand, acetone, heat and applied. Also added goop to the inside and outside to ensure it doesn't come off. This strip of rubber seal seems like it was custom fit to be put on the hatch seal. I tested with a garden hose and submerged 1/4 of the front hatch underwater while dropping off a dock into the harbor and to my surprise I had a bone dry inside. I wasn't expecting that, and so either this is a great solution or I got lucky with my install. Either way, I'm not complaining. Of course, only a series of knarly surf launches will really be the only true test. I also added this spray-on rubber stuff like bed liner stuff to the hatch so I had that "rubber to rubber" gripping going on. Zed - get your mind out of the gutter .... Third I added this rubber plug from home depot to keep it plugged. This thing fits like a glove and again to my surprise absolutely no water came in. It's not permanent, just plugged up there and stays put. For some reason it plugs perfect from the bottom but not the top. I think because during the molding it's always different how the scupper holes come out. I added a string and something to keep from losing it down the hole when I push down to unplug it. I might want to let water in or out and then plug it back up by pulling up on the string for whatever reason. |
|
|
|
|
06-30-2008, 08:55 PM
|
#12 |
|
Senior Member

Join Date: Mar 2005
Posts: 2,568
|
 Very nice job Grego! What a humble and gentle opening line... lol
__________________
 [------------------------ [------------------------ <)))< ....b-a-a-a-a |
|
|
|
|
06-30-2008, 09:34 PM
|
#13 |
|
PROBATION
Join Date: Jul 2005
Posts: 657
|
You have really done a nice job Grego.
As always, you have over thought your mods for function no doubt. X-13 might be in my future...(hot pink of course, since you already have the virgin white NEMO V already. People gotta be able to tell us apart)!  Your Surf to Summit seat GTS PRO seat/ fighting chair- I agree its hands down it is the most comfortible seat I have ever used!!!!. If there was a more comfy cozy seat / Fighting Chair, I would use it. What ever the cost it, its worth every penny! Being comfortible is priceless. Q. I have no skillz or time to when it comes to buy or mod my stuff...are you / Malibu going to sell this as a kit, or should I go to www.hook1kayakfishinggear.com for all my kayak fishing goodies as always? 
|
|
|
|
|
07-01-2008, 11:03 AM
|
#14 |
|
Senior Member

Join Date: Jun 2008
Location: OC
Posts: 397
|
Can you post some photos of what you are using setup wise for water exiting the bait tank?
|
|
|
|
|
07-03-2008, 11:27 AM
|
#15 | |
|
Senior Member
Join Date: Mar 2005
Posts: 446
|
Quote:

|
|
|
|
|
|
07-03-2008, 12:22 PM
|
#16 |
|
BRTF...bought & paid...

Join Date: Mar 2005
Posts: 1,247
|
Nice looking job there Grego...you're hired, get ready to rig mine up soon.
Now go get some blood on the yak... 
__________________
Adios Tman Gaffer for Clay the Fishcatcher 
|
|
|
|
|
07-06-2008, 12:54 PM
|
#17 |
|
Senior Member
Join Date: Nov 2007
Location: Canyon Country, Ca.
Posts: 116
|
Grego, that's one slick boat, great mods especially the thru hulls for the bait tank.......
 H H
__________________
mellow yellow malibu eXtreme |
|
|
|
|
07-07-2008, 02:30 PM
|
#18 |
|
Senior Member
Join Date: Jun 2008
Location: OC
Posts: 397
|
Grego:
Thanks for posting the very technical exit holes! I currently have a large hose going over the side. Is there any advantage or disadvantage to having the water just run into the back of the 'yak just using the holes? How fast does it drain out? I have an X-Factor bait tank now but am not happy with the over the side tubing for the bilge pump and drain. Tried the pump thru the scupper hole before but priming issue were a pain. |
|
|
|
|
07-07-2008, 08:25 PM
|
#19 |
|
Senior Member
Join Date: Mar 2005
Posts: 446
|
The two scupper holes are large enough to drain the water, there's always a 1/8" of water floating around in the well back there because it doesn't flow perfectly down the hole. If that bothers you then keep the tube hanging out. It doesn't bother me because it's suppose to be wet back there anyhow from launching, water coming up the scuppers, the unexpected side swells, etc....
|
|
|
|
|
07-09-2008, 07:03 AM
|
#20 |
|
Member
Join Date: May 2008
Location: CARLSBAD
Posts: 34
|
through hull or not
Grego,
Great post I'm new to the sport,been fishing this year in fresh water and just started to hit harbors and bays. Noticed most kayak fisherman are fishing live bait,so I started checking out their setups.I really like your bait tank rigging clean functional, really cool.I also like your "marine supply" sources, I've found good stuff for my boat at Home Depot,K Mart and even Ralphs. Anyway, question is with the through hull pump mounting,is the vibration when the pump is on sending a resonace through the boat into the water and doe's it alarm/spook the fish?Also do you have any pump prime problems? Thanks again for the great info Dave
|
|
|
|
|
|
|


 Linear Mode

