|
|||||||
| Home | Forum | Online Store | Information | LJ Webcam | Gallery | Register | FAQ | Community | Calendar | Today's Posts | Search |
 |
|
|
Thread Tools | Display Modes |
|
|
 12-19-2009, 10:39 AM
|
#1 |
|
Senior Member
Join Date: Apr 2005
Posts: 286
|
__________________
 |

|

|
|
12-19-2009, 03:37 PM
|
#2 |
|
Guerro Grande

Join Date: Jan 2006
Location: Houston, TX
Posts: 629
|
Brian
Don't forget your greatest engineering feat - the combination rod holder/evaporative cooling system/roll bar. 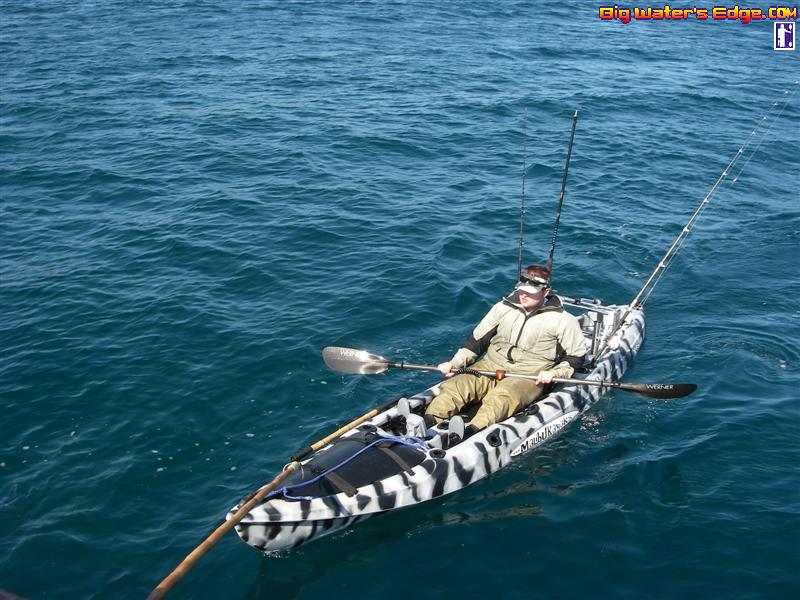 That thing was super bitchin' 
__________________
Douglas Gaxiola  Team No Fish- Amateur Staff Team No Fish- Amateur Staff |
|
|
|
|
12-20-2009, 04:47 PM
|
#3 |
|
Junior
Join Date: Mar 2007
Location: Huntington Beach
Posts: 26
|
For coilcord, try the 99cent stores. Sometimes they have it, sometimes they don't
|
|
|
|
|
12-22-2009, 12:43 PM
|
#4 |
|
Senior Member
Join Date: Mar 2005
Location: Jamul, CA
Posts: 243
|
The Bait Bazooka.
 
__________________
Thanks, bluesquids |
|
|
|
|
01-06-2010, 08:57 PM
|
#5 |
|
Olivenhain Bob

Join Date: May 2008
Location: Olivenhain, CA
Posts: 1,122
|
Bump
Come on guys, you have to have some more good stuff to share. Bob |
|
|
|
|
01-11-2010, 10:58 AM
|
#6 |
|
Administrator

Join Date: Mar 2005
Location: 1-2 miles off the point
Posts: 6,948
|
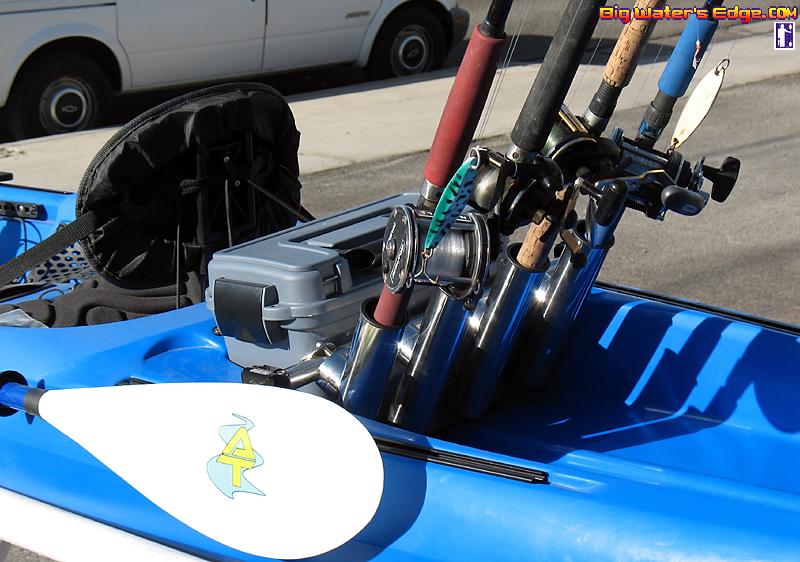
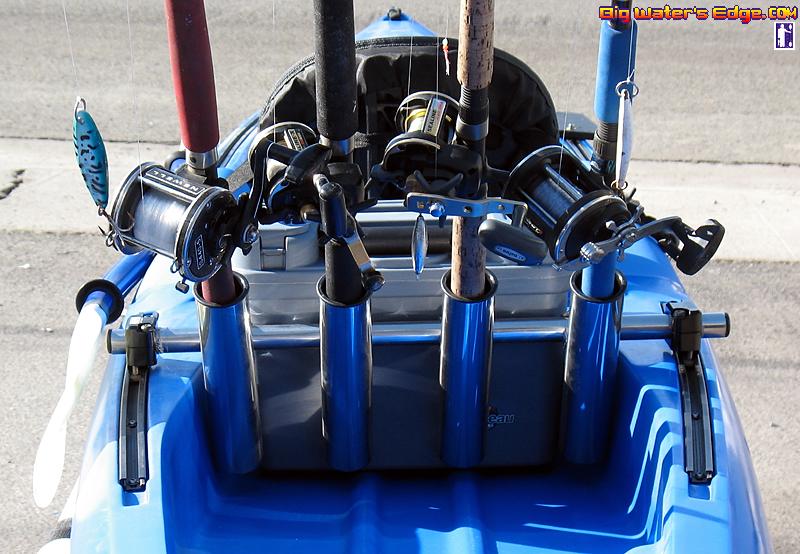
RPG BLING
__________________
 
|
|
|
|
|
01-11-2010, 11:16 AM
|
#7 |
|
Olivenhain Bob
Join Date: May 2008
Location: Olivenhain, CA
Posts: 1,122
|
Iceman,
That's a nice setup. Did the adjustable tracks come on your kayak or did you add them? Where does your bait tank go when using these rod holders? It would be nice if the two outside tubes could be angled out a bit for wider separation when tolling. Is this possible? Bob |
|
|
|
|
01-17-2010, 06:25 PM
|
#8 |
|
Olivenhain Bob
Join Date: May 2008
Location: Olivenhain, CA
Posts: 1,122
|
By popular demand, this device which was introduced in another post is being added to this thread.
Enjoy Bob Permanent Wet Transducer Installation Today's project was to come up with a way to permanently install a new Fish Finder Transducer using the wet method. I would like to take credit for this idea but truth be told, I found a post from a guy in Australia who came up with this idea a year or two ago. I have modified the original installation a bit. You will need a 3" piece of drain pipe or a 3" adapter, some sort of cap that will screw or clamp to the top of the adapter, some goop, a few stainless screws and a fish finder with transducer. I used a rubber cap a threaded 3" adapter. You could also use a threaded cap but I thought the rubber cap would provide a better water seal. The first step is to attach the "well" to the hull of the kayak. I shaved the bottom of the adapter a bit to make it fit the contour of the hull and gooped it to the plastic making sure there would be no leaks once the well was filled with water. Next came mounting the transducer to the cap. I sliced an X in the rubber that would expand large enough to allow the transducer plug to fit through. You could also drill a hole but that would mean a larger waterproof patch later. In the middle of the X I drilled a hole large enough for the cable to slide through without distorting the rubber. Using the transom mount that came with the transducer, I attached the transducer to the inside of the cap making sure that everything would fit inside the well when the cap was installed. I marked the top of the cap to show the direction the front of the transducer was pointing and gooped the area where the cable passed through to make it water tight. After the goop cured, I filled the well with water, slid the cap with transducer over the top and tightened the hose clamp. The completed installation is below. If all goes according to plan, I should be able to fill the well with water once and forget about it. No more constantly checking the foam ring to make sure the water has not spilled, dried up or drained away. Since I store and transport my kayak upside down It is very important that this thing does not leak. We will see. I have not yet tested this installation on the water but hope to go to La Jolla on New Years Day. If you see me out there, please feel free to paddle on over and check this installation out. I have a couple concerns beyond whether this thing will remain water tight. Will the fact that there is about an inch of water between the transducer and the hull have any effect? Since the temperature sensor is inside the well, it will probably not give a very accurate reading. The water in the well will have to stabilize with the ocean water. That could take some time. It will almost certainly not be able to detect subtle changes in the water temperature as I peddle from one place to another. All things considered, this is not a very big deal. See you out there. Bob UPDATE: I have tested this setup a couple times and it works perfectly. It has been stored upsided down for a couple weeks now and no leaks have appeared. The issue with the temperature not responding immediately is real. It typically takes about a half hour for the reading to stabilize with the ocean water. As for performance, the fish finder works perfectly, much better than my previous installation although I am sure that part of the improvement is due to the fact that my new FF has better resolution than the old one. Last edited by dsafety; 01-18-2010 at 06:07 AM. |
|
|
|
|
09-16-2010, 07:23 PM
|
#9 |
|
Senior Member

Join Date: Apr 2010
Posts: 6,856
|
OK...lets see if I finally figured out the whole text between pics thing
Here are my innovations...some you might recognize. FF mounted onto a Pelican 1120 waterproof case. The power cord runs from the FF through the FF mount and into the case. The transducer cord runs from the FF into the hull of the yak via a clam style waterproof seal.  I decided to do without the wet mount for the transducer and opted to mount it in one of the scupper holes. The transducer cord runs from the FF into the hull and back out right near the scupper hole.   One of the problems I encountered was that because the top of the transducer sat flush with the bottom of the yak it did not allow water to drain out the scupper hole. I decided to take some 1-1/2" pvc and cut a piece about 1/4" long. I took a rats tails file and make a few notches to allow water to drain between the yak and the top of the transducer....works great!!!  During some of my trips I would have issues closing the hatch that sits right in from of the seat. I'm 5'10" and weigh about 230, I was causing a slight bend on the edge of the hatch and this would prevent me from getting the hatch installed. I decided to take some 1" x 1" angle iron and mounted it both to the yak and the hatch, this helped keep them somewhat straight and prevent most if not all of the bend. I secured the angle iron to the hatch with some aluminum rivets and used the existing nuts and bolts to mount it onto the rim of the hatch.    When I sold my boat I ended up with two gaffs so I decided to take one and cut it down. Not wanting to lose grip of it when and if I ever gaff a large fish I took an old belt and strapped it down using some large zip ties. For comfort reasons I wrapped the belt in a manner that would allow it to stay flush as it wrapped around my hand. Fits better than OJ's glove...much better!    I've got a few more to post but I have to get to work soon so I'll post them tomorrow. Let me know what you think!!! THANKS to BTFDAVID and GREG ANDREW!!! Last edited by jorluivil; 09-16-2010 at 11:05 PM. |
|
|
|
|
03-21-2011, 08:14 PM
|
#10 |
|
"Floater"
Join Date: Sep 2010
Location: so cal
Posts: 164
|
Hobie battery box
I decided to engineer a new box for my outback for the rear 8" hatch since it doesn't get used for anything else. I was using the dry bag method up to now.
All that's needed is a CNC router, Hand held router, table saw, 1/2" and 1/4" ABS plastic, ABS glue and some basic dimensions. Directions; For the rounded part; Program the router using master cam, load drawing into CNC machine operating software. Adhere the 1/2" sheet of ABS to the router. Push the go button. Wait a couple minutes, remove plastic from router. (The round hole in the top serves two purposes; one is to route the power cable, the other is a finger hole to lift it out.) Cut squared pieces to proper dimensions using the table saw. Glue it all together with ABS glue. Let sit for 24 hours to cure. Use the hand router to round off the top edge of the box. The box should fit any Hobie with 8" round hatches. The battery I use is a 12 volt, 14AH. Slightly larger than typical but I can run my FF/GPS for about 3 days without a charge if necessary. If you use a typical battery with the box I made, you can put your keys and wallet in it too. Last edited by Kaijuu; 03-22-2011 at 07:01 AM. |
|
|
|
|
04-22-2011, 02:47 AM
|
#11 |
|
Junior
Join Date: Apr 2011
Posts: 3
|
Nice thread,
 good for the informations. good for the informations.I love it 
|
|
|
|
|
07-03-2012, 03:43 PM
|
#12 |
|
Senior Member

Join Date: Sep 2011
Posts: 598
|
portable rod holder.
well since I'm stuck on land for awhile. I wanted to update my rod holder. One that can hold more rods and it doesn't' get in the way of my hobie when its loaded on my truck. everything cost under $50 |
|
|
|
|
07-25-2012, 06:24 AM
|
#13 |
|
Senior Member
Join Date: Sep 2011
Posts: 598
|
here are some videos of the new mods.
Fish grip http://www.youtube.com/watch?v=rl9SdS0Z4k8 extra pocket http://www.youtube.com/watch?v=SWazfpWpGB0 |
|
|
|
|
09-28-2012, 08:38 AM
|
#14 |
|
.

Join Date: May 2010
Posts: 1,155
|
Hobie Pro Angler 12 rudder mod
i made a new larger rudder for the PA 12. it was made out of lexan (polycarbonate) the process took about an hour to made and another hour to fit.
sorry for the crappy cell phone pic's  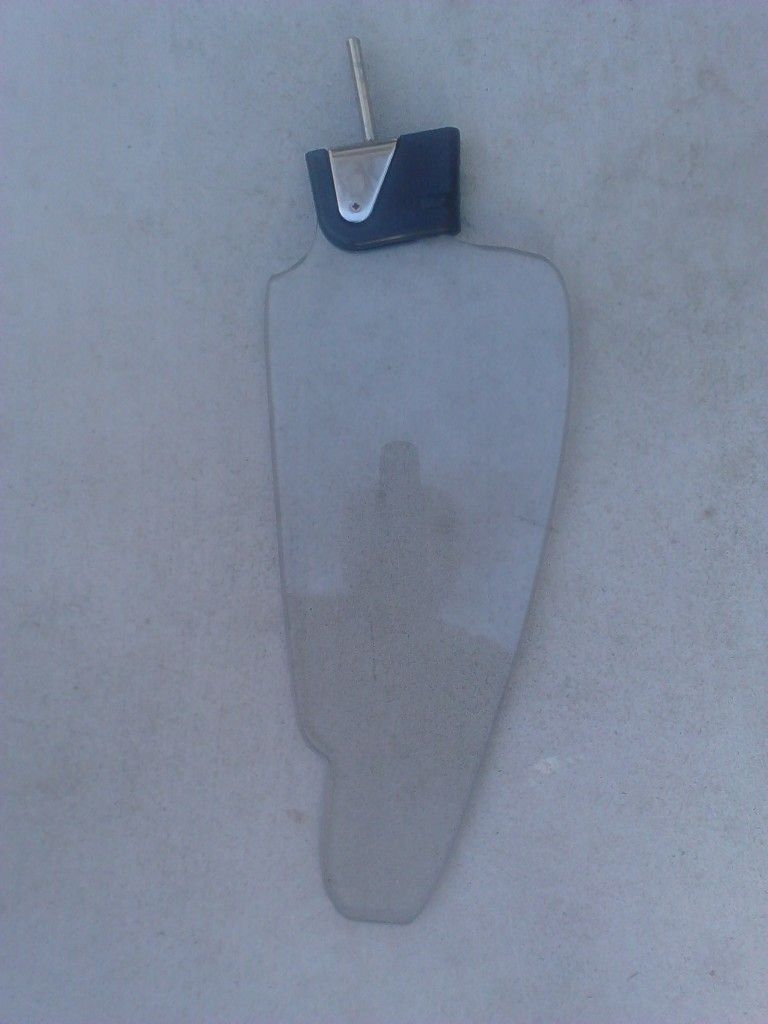 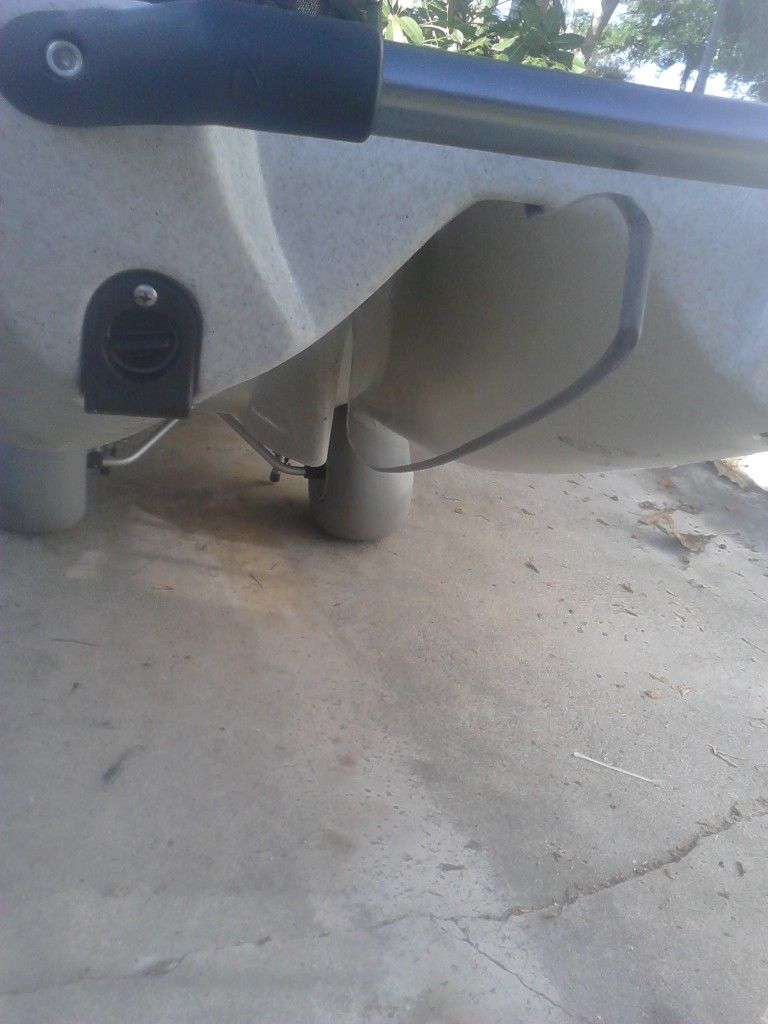 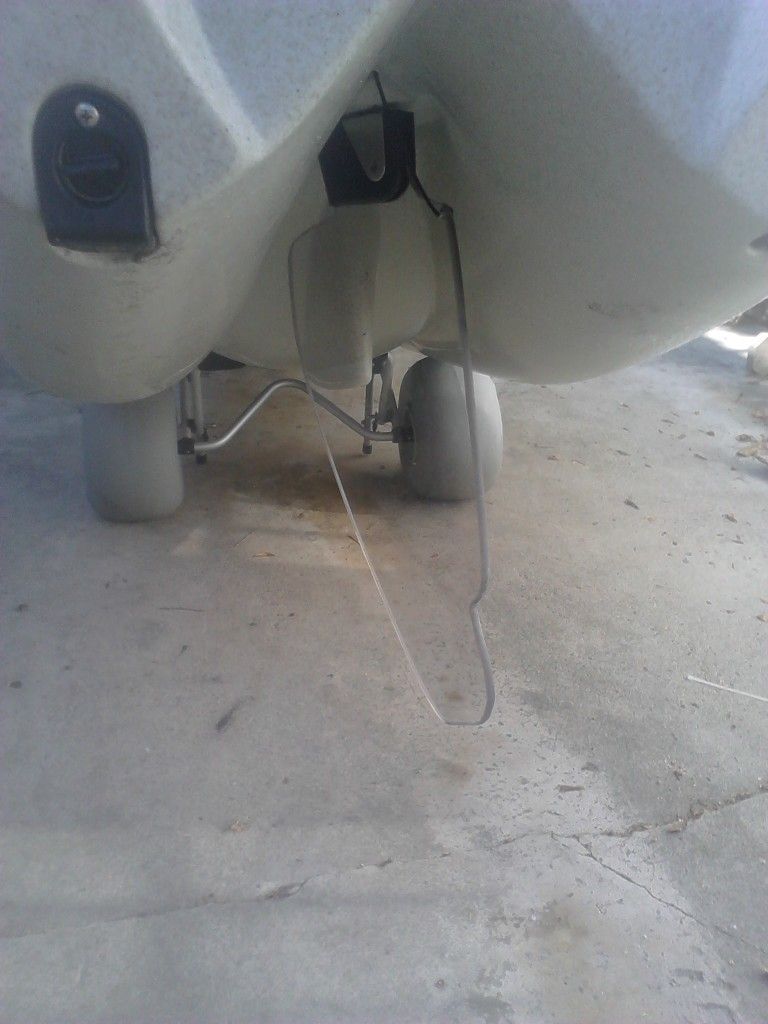 testing it out tomorrow for bug hunt'n
__________________

|
|
|
|
|
04-16-2013, 06:59 AM
|
#15 |
|
Senior Member
Join Date: Mar 2012
Location: Utah
Posts: 138
|
I wanted to install an anchor trolley on my Hobie Prangler 14, but didn't especially want to drill any more holes in it. The front and rear carry handles suggested an option, and a bit of household wiring provided the means. I simply loosened the handle bolt and slipped the hooked ends of a short piece of wire underneath. I got the pulleys at the hardware store for less than three bucks. (I boat only in freshwater, so I didn't need to spring for stainless steel pulleys.) Here's the front handle:
 And here's the rear:  From here on, the rigging is pretty standard. If you are looking for a quick and inexpensive way to rig an anchor trolley, I hope this helps. |
|
|
|
|
12-11-2013, 02:22 PM
|
#16 |
|
Member
Join Date: Dec 2013
Location: Santa Fe Springs
Posts: 42
|
here is the front view. Changed the chair, put off road lights, and got it wrapped. Also got the ram mount for my transducer to hang off the side, and hid the 12v in my tackle box in the middle of the kayak. My electrical has all lazer etched switches for each light and have a usb cord if I need to charge my phone, you can see how neat the wiring is in picture 3.
Last edited by ROOKIE87; 02-26-2014 at 12:50 PM. |
|
|
|
|
01-31-2014, 07:39 AM
|
#17 |
|
Junior
Join Date: Mar 2011
Posts: 6
|
Pro Angler 14 dual seats Innovation
Pro Angler 14 Dual seats/tandumn seats.
This is such a big boat, why be selffish share a ride.
|
|
|
|
|
03-15-2014, 04:50 PM
|
#18 |
|
Catch and Release(#2)

Join Date: Oct 2013
Location: Oceanside
Posts: 77
|
OHHHHH CRAP!
OH my my my What do I do, im to far out to turn back I wont make it. My legs are shaking, im in a wet suit or waders and im going into labor.
DUN DUN DUNNNN INTRODUCING THE NEW HOBIEWANand2KANOBIE. Look at the pictures and figure it out, no instructions included. For the wan use the hose, for the 2 hold your nose. Close the lid and stop water from going into the kayak The Pro anglers cutting board changes to a magazine/newspaper table For hobie kayaks only 
__________________
Philippians 4:13 I can do all things through Christ who strengthens me  Caddiyak PA14 Last edited by ChristLike; 03-15-2014 at 05:16 PM. |
|
|
|
|
08-13-2014, 10:23 AM
|
#19 |
|
Senior Member
Join Date: Apr 2012
Posts: 291
|
reel covers
not my original idea but didn't see anybody post it yet. They work great especially for the bigger reels
|
|
|
|
|
11-20-2014, 01:42 PM
|
#20 |
|
Junior
Join Date: Sep 2014
Location: Louisville, TN
Posts: 6
|
Add on to the stealth 12.
Grabbing extra poles are easy from the stock rear holders, But being a short person I had problems reaching my extra poles, net or gaff from the stock front pole holders. The 2012 has threaded inserts behind the seat so with a piece of aluminum square stock screwed into them and four scotty mounts I fixed that problem. Now i can reach all my gear from behind me. this is what the finished product looks like.
Having four additional mounts without drilling any holes in the kayak makes it easy to change the layout when needed. This also makes it easy to remove if I were to sell it to someone that didn't want the extra mounts behind them. Also with the built in bait well I don't need to reach behind me for a bait bucket. |
|
|
|
|
| Tags |
| kayak fishing inovations, kayak rigging ideas |
|
|


 Hybrid Mode
